This article is based on the webinar "Automate Data Flows between Legacy and Cloud". The article is more detailed and step by step with code. If you prefer to watch the webinar of 1 now, hit click here and choose 'watch replay' at the end.
Why orchestrate processes?
Orchestrating and automating processes is part of the objectives of companies in their digital transformation phase. This is because many companies with more years in the market, have legacy systems fulfilling essential roles decades ago. Therefore, when companies seek to modernize their processes, the right thing to do is to do it incrementally, with decoupled services and deployed in a hybrid cloud: with cloud and on premise components working together.
One of the Amazon Web Services services that we like the most in Kranio and in which we are experts, is Step Functions. It consists of a state machine, very similar to a flowchart with sequential inputs and outputs where each output depends on each input.

Each step is a Lambda function, i.e. serverless code that only runs when needed. AWS provides the runtime and we don't have to manage any kind of server.
Use Case
A case that helps us to understand how to apply Step Functions, is to create sequential records in multiple tables of an on premise DB from a cloud application, through an api rest with an event-driven architecture.
This case can be summarized in a diagram like this:

Here we can see:
- A data source, such as a web form.
- Data Payload: the data we need to register them in the DB.
- CloudWatch Events: Also called Event Bridge, these are events that allow you to "trigger" AWS services, in this case, the State Machine.
- Api Gateway: AWS service that allows you to create, publish, maintain and monitor apis rest, http or websockets.
- A relational database.
Advantages
The advantages of orchestrating on premise from the cloud are:
- Reuse of existing components without leaving them behind
- The solution is decoupled, so that each action to be performed, has its own development, facilitating maintenance, error identification, etc.,
- If business requirements change, we know what happened and what needs to be changed or between which steps a new status needs to be added.
- in case changes are required, it mitigates the impact on the on premise as the orchestration is in the cloud, .
- With serverless alternatives, there is no need to manage servers and their operating systems.
- They are low cost solutions. If you want to know more check the prices of using Lambda, Api Gateway, SNS and CloudWatch Events.
And now what?
You already know the theory of orchestrating a data flow. Now we'll show you the considerations and steps you need to take into account to put it into practice.
Development
The resources to be used are:
- An Amazon Web Services account and have AWS CLI configured like this link
- Python +3.7
- The Serverless framework (learn how to setup here )
- The Boto3 Python library
How to leave
Being an orchestration we will need to identify the sequential steps we want to orchestrate. And since the orchestration is to automate, the flow should also start automatically.
For this we will base ourselves on the use case presented above, and we will suppose that the DB in which we write, corresponds to one of the components of the CRM of a company, that is to say, one of the technologies with which the customer base is managed.
We will create an event-driven solution, starting the flow with the reception of a message from some source (such as a web form).
After the event is received, its content (payload) must be sent via POST to an endpoint to enter the database. This DB can be cloud or on premise and the endpoint must have a backend that can perform limited operations on the DB.
To facilitate the deployment of what needs to be developed we use the Serverless framework that allows us to develop and deploy.
The project will be divided into 3 parts:
If you can better understand these conversations, rank (word cloud), prioritize and engage users, you can improve a lot and build a true cult following.
Then these projects are deployed in the order infrastructure >> step-functions >> api-gateway.
It can be the same directory, where we dedicate 3 folders. The structure would be as follows:
├──api-gateway
│ ├── scripts-database
│ │ ├── db.py
│ │ └── script.py
│ ├── libs
│ │ └─└─ api_responses.py
│ ├── serverless.yml
│ └─── service
│ ├── create_benefit_back.py
│ ├── create_client_back.py
│ └──create_partner_back.py
├──infrastructure
│ └─── serverless.yml
└── step-functions
├── functions
│ ├── catch_errors.py
│ ├── create_benefit.py
│ ├── create_client.py
│ ├── create_partner.py
│ └── receive_lead.py
├── serverless.yml
└└── services
└──crm_service.py
Talk is cheap. Show me the code.
And with this famous quote from Linus Torvalds, we will see the essential code of the project we are creating. You can see the detail here.
Backend
The previous endpoints are useless if they don't have a backend. To relate each endpoint with a backend, we must create Lambda functions that write in the database the parameters that the endpoint receives. Once the Lambda functions are created, we enter their ARN in the "uri" parameter inside "x-amazon-apigateway-integration".
A key thing about Lambda functions is that they consist of a main method called handler that receives 2 parameters: message and context. Message is the input payload, and Context contains data about the function invocation and data about the execution itself. All Lambda functions must receive an input and generate an output. You can learn more here.
The functions of each endpoint are very similar and only vary in the data that the function needs to be able to write to the corresponding table.
Function: createClient
Role: creates record in the CLIENTS table of our DB
Function: createPartner
Role: creates record in the PARTNER table of our DB
Function: createBenefit
Role: creates record in the BENEFIT table of our DB
IaaC - Infrastructure as Code
In the serverless.yml code we declare all the resources we are defining. To deploy them, you must have AWS CLI properly configured and then run the command
This generates a Cloudformation stack that groups all the resources you declared. Learn more here.
In the Serverless.yml files you will see values like this:
If you can better understand these conversations, rank (word cloud), prioritize and engage users, you can improve a lot and build a true cult following.
These are references to strings in other yml documents within the same path, pointing to a particular value. You can learn more about this way of working here.
Api Gateway
For the api rest we will build an Api Gateway with a Serverless project.
The purpose of the API is to receive requests from the Step Functions, registering data in the database.
The Api Gateway will allow us to expose endpoints to which to perform methods. In this project we will only create POST methods.
We'll show you the basics of the project and you can see the details here.
OpenAPI Specification
An alternative to declare the API, its resources and methods, is to do it with OpenAPI. To learn more about Open Api, read this article we did about it.
This file is read by the Api Gateway service and generates the API.
Important: if we want to create an Api Gateway it is necessary to add to the OpenApi an extension with information that only AWS can interpret. For example: the create_client endpoint that we call via POST, receives a request body that a specific backend must process. That backend is a lambda. The relationship between the endpoint and the lambda function is declared in this extension. You can learn more about it here .
When you deploy the project, Api Gateway will interpret this file and create this in your AWS console:

To know the URL of the deployed API, you must go to the Stages menu. The stage is a state of your api at a given time (note: you can have as many stages as you want with different versions of your API). Here you can indicate an abbreviation for the environment you are working in (dev, qa, prd), you can indicate the version of the api you are doing (v1, v2) or indicate that it corresponds to a test version (test).
In the Api Gateway console, we indicated that we would make a deploy with stage name "dev", so when you go to Stage you will see something like this:

The URLs of each endpoint can be found by clicking on the names listed. This is what the create_client endpoint looks like:

Infrastructure
Here we will create the relational database and the Event Bridge event bus.
For now the DB will be in the AWS cloud, but it could be a database in your own data center or in another cloud.
The Event Bridge event bus allows us to communicate 2 isolated components that may even be on different architectures. Learn more about this service here
This repository is smaller than the previous one, as it only declares 2 resources.
Serverless.yml
If you can better understand these conversations, rank (word cloud), prioritize and engage users, you can improve a lot and build a true cult following.
You need to create the following tables in your DB. You can be guided by these database scripts here.
If you can better understand these conversations, rank (word cloud), prioritize and engage users, you can improve a lot and build a true cult following.
With these steps we finish the creation of the infrastructure.
Step Functions
Each "step" of the State Machine that we will create is a Lambda function. Unlike the Lambda that I talked about in the Api Gateway item and that have the role of writing to the DB, these make requests to the endpoints of the Api Gateway.
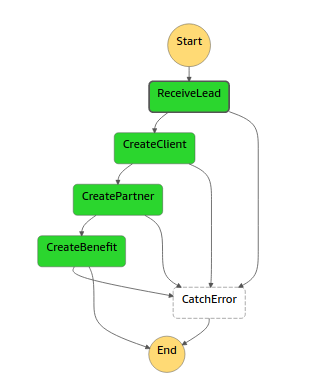
According to the above architecture based on a sequential flow, the State Machine should have these steps:
- Receive data from a source (e.g. Web form) via Event Bridge event.
- Take the event data, build a payload with the name, last name, phone, branch and rut to the create_client endpoint for the backend to write it in the CLIENTS table.
- Take the data from the event, build a payload with the rut and branch to the create_partner endpoint for the backend to write it in the PARTNERS table.
- Take the data from the event, build a payload with the rut and wantsBenefit to the create_benefit endpoint for the backend to write it to the BENEFITS table.
- You can create an additional Lambda to which the flow arrives in case there is an error in the execution (example: the endpoint is down). In the case of this project, it is called catch_errors.
Therefore, a Lambda is made per action of each step.
Function: receive_lead
Role: receives the Event Bridge event. Cleans it up and passes it to the next Step. This step is important because when an event is received, it arrives in a JSON document with attributes defined by Amazon, and the content of the event (the JSON of the form) is nested inside an attribute called "detail".
When a source sends you an event through Event Bridge, the payload looks like this:
We can define a Lambda that returns the contents of "detail" to the next function, as in the following example:
Function: create_client
Role: Receives in message the content of the Lambda from the previous step. It takes the content and passes it as an argument to the instance of the CRMService class.
In the CRMService class we declare the methods that will perform the request according to the endpoint. In this example, the request is to the create_client endpoint. For the API calls we used the Python Requests library:
The Lambda functions for create_partner and create_benefit are similar to create_client, except that they call the corresponding endpoints. You can check case by case in this part of the repository.
Function: catch_error.py
Role: it takes the errors that are presented and can return them to diagnose what may have happened. It is a Lambda function like any other, so it also has a handler, context and returns a json.
Then we declare the Serverless.yml of this project
Now we have the Lambda functions for each step of the State Machine, we have the API that writes to the DB and we have the endpoint exposed to make requests.
Sending a message to the Event Bridge event bus
For all this to start interacting, it is necessary to send the event that initializes the flow.
Assuming we're working on your company's CRM, and you're getting the initial data from a web form, the way to write to the event bus that will initialize the flow is through the AWS SDK. Learn about the languages for which it is available here
If you are working with Python, the way to submit the form would be this:
Once you have configured everything correctly, you should go to the Step Functions service in your AWS console and see the list of events sent:

If you choose the last event, you will see the sequence of execution of the Step Functions and the detail of their inputs and outputs..:

Where when choosing the ReceiveLead step, the input corresponds to the payload sent as an event via Event Bridge.

The test of truth
If you enter your database (either with the terminal client or with an intuitive visual client) you will see that each piece of data is in each of the corresponding tables.

Conclusions
Step Functions is a very powerful service if you need to automate a sequential flow of actions. We now elaborate a simple example, but it is highly scalable. In addition, working with Step Functions is an invitation to decouple the requirements of the solution you need to implement, which makes it easy to identify failure points.
This type of orchestration is completely serverless, so it is much cheaper than developing an application that runs on a server just to fulfill this role.
It's a great way to experiment with a hybrid cloud, reusing and integrating applications from your data center, and interacting with cloud services.
Do you want to accelerate, simplify and reduce the costs of your data flows with serverless and step functions? Need help getting started? Let's talk!


%2011.18.35%E2%80%AFa.%C2%A0m..png)

%201.17.38%E2%80%AFp.%C2%A0m..png)


.png)
.png)
