API stands for application programming interface. It is a set of definitions and protocols used to develop and integrate application software. There are several types of protocols for APIs, the most currently used is REST.
The flow of a REST API is generally as shown in the diagram. The client makes a request to the API, the API communicates with the database or instructs the server to process the client's request and the information is returned to the client as a response. To communicate with the api, and thus with the server, we need to do it through an interchange language, usually JSON or XML.

The API is the intermediary between the client application and the server, and as such, it allows to identify the caller, enable access to resources and monitor information traffic. They are reusable across multiple platforms and have the ability to work in the backend and frontend in parallel or independently. This makes applications easy to scale, flexible and reliable.
Impact of an API
The API is in most of the interactions we have with public or private systems. Organizations can create their own APIs to be able to coordinate the information of the different sections of the company or public body, companies leave their APIs in a public way so that anyone can access and spread their information, other companies have the API as the center in the availability of their services.
Advantages of an API
Implementing an API in your company, organization or application allows you to reuse functions in different software. This reduces the efforts in the maintenance of applications and also the time-to-market of your developments, regardless of the technologies you use. It helps you to monitor your company's transactions in order to make better decisions for your projects and react in time in case of any failure. It facilitates the processes of innovation and transformation of developments.
The OpenAPI Specification
There are several ways to generate an API contract, among them the RAML specification or API Blueprint. The most widely used is OpenAPI 3.0 (OAS3, formerly Swagger v2.0), which is open-source and uses JSON or YAML code to describe, document and consume APIs. It has a modular structure that facilitates reusability and cooperation between developers.
OAS3 contains extensions that allow us to connect to other services such as ReDoc, APIMatic and Amazon API Gateway.
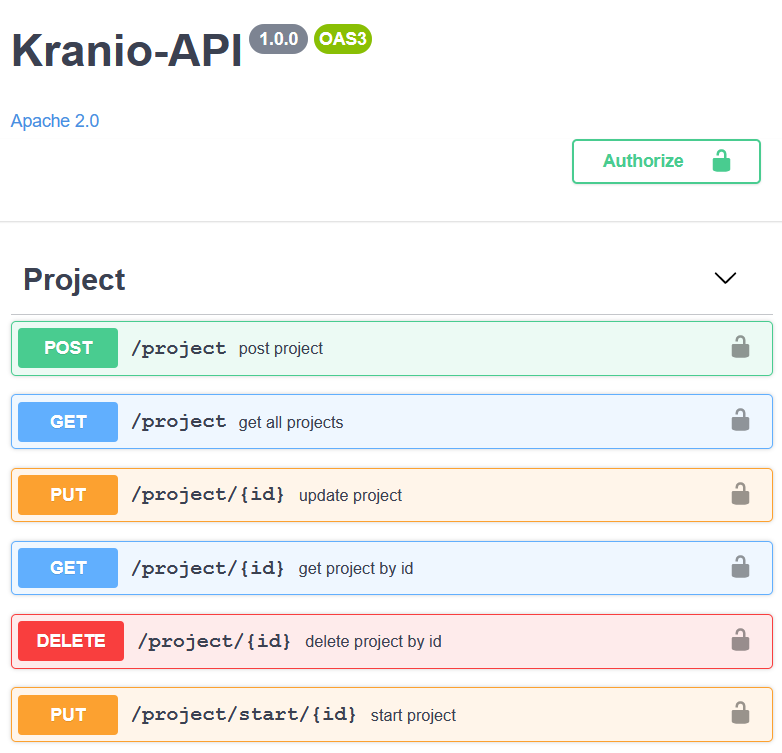
Here are some examples of OAS3 code and its auto-generated documentation in the swagger editor.
AWS API Gateway
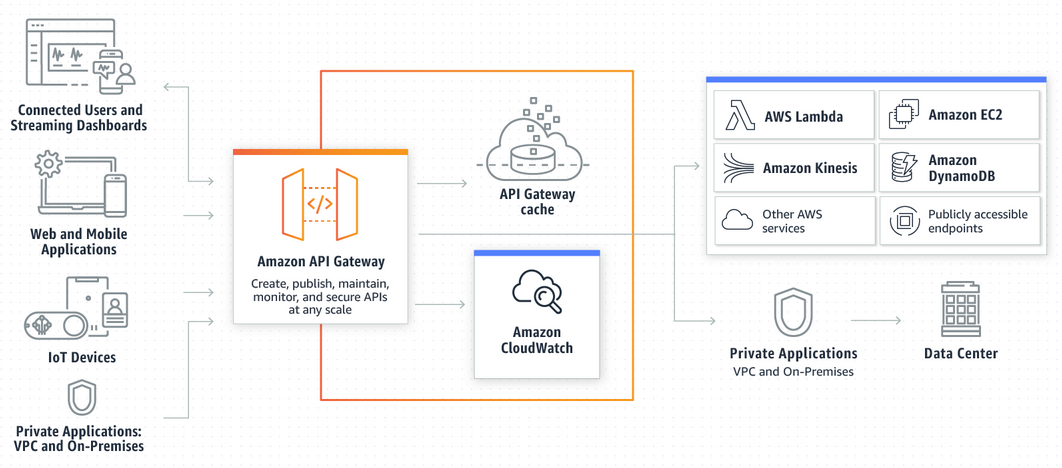
It is an Amazon Web Services (AWS) service that allows you to create, publish, maintain and secure APIs.
The client's request can be processed by private applications, pre-existing endpoints or by other AWS services such as DynamoDB, Kinesis, EC2 and others. The most used is AWS Lambda that executes code without the need to own a server and supports different programming languages.
Endpoints
API Gateway describes the endpoints with their resources and methods and each method can be integrated and configured independently.
You can generate the endpoints and their configurations with an OAS3 file, importing it into API Gateway with the necessary extensions.
You can also describe and configure these endpoints through the AWS console which is simple and intuitive.
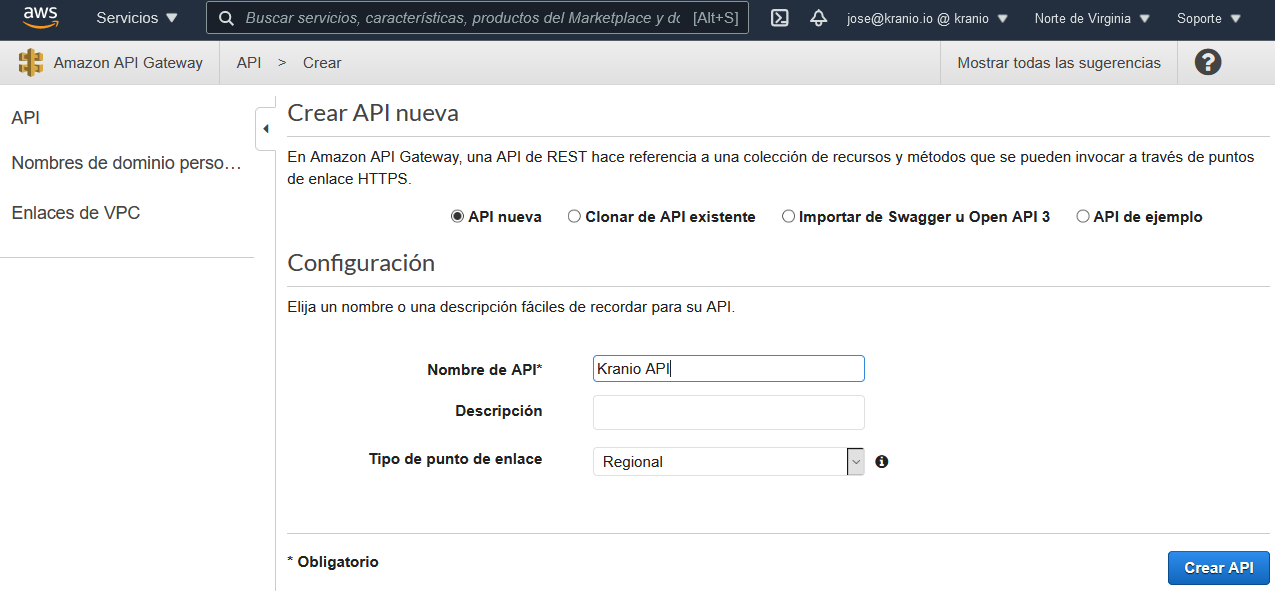
Step 1: Log in to the AWS API Gateway service and click the Create API button, choose to create a REST API (not the private one) and name the new API.

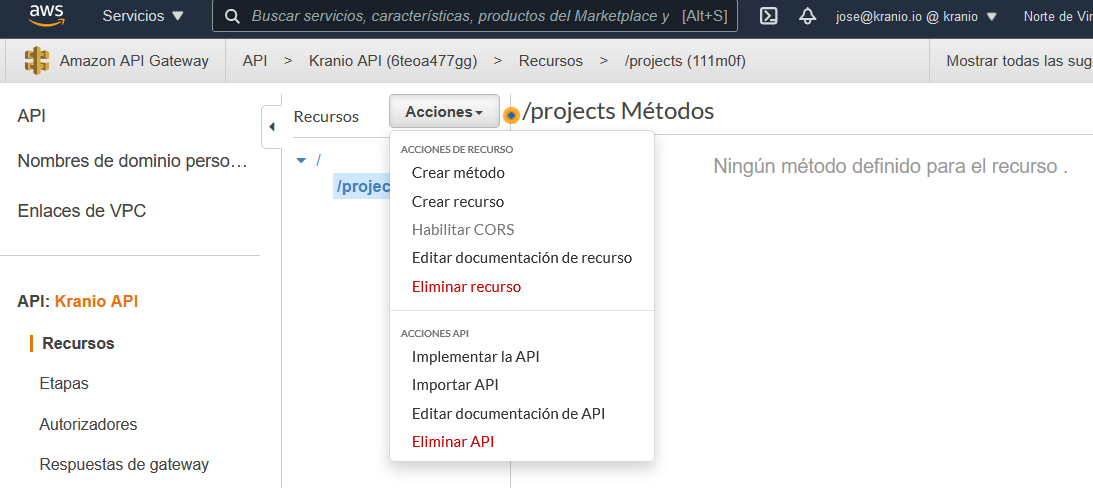
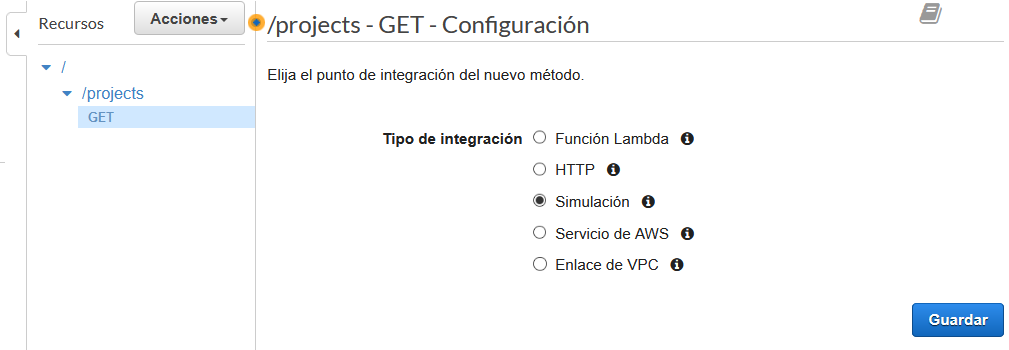
Step 2: In the Actions dropdown choose Create resource and give it a name. Inside this resource choose from the same dropdown the option Create method . When you select and accept the method you will be presented with the option to choose the integration, for now select Simulation (mock).
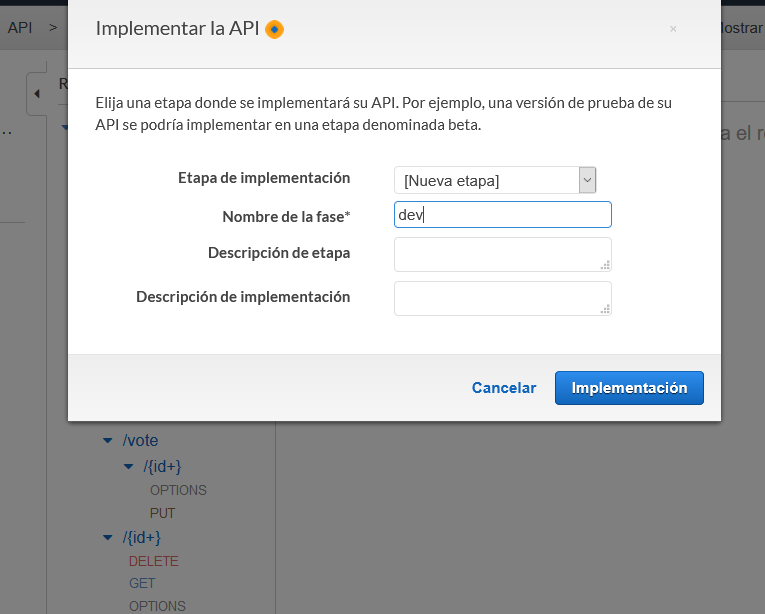
Step 3: Once you have defined all the resources and methods for your API, select the Deploy API option from the Actions menu. Create or select a Deploy Stage, which will serve to sort the API versions.
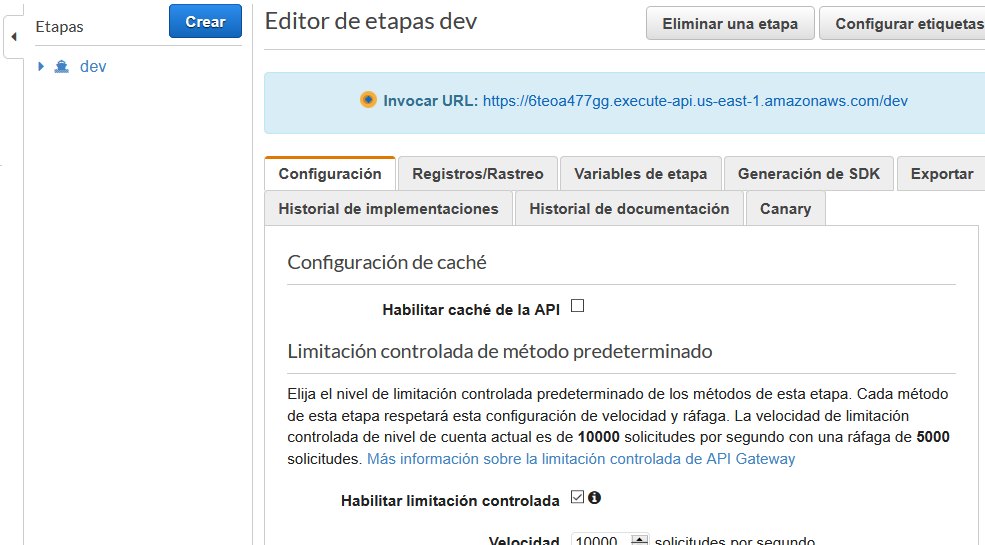
Step 4: You will be redirected to the Stages section where you will see the link to call your API! You can choose a tool like Postman or Insomnia to test your endpoints.
Integrations
In API Gateway there are different types of integrations and each one can be proxy or non-proxy . Both can transform the request coming from the client but only non-proxy can transform the response coming back from the server.
Transforming the request coming from the client is useful when integrating two different applications or passing additional parameters in the body or header of the request.
Transform server response is useful for sorting the server response, adding headers and modeling by response code. This is unique to the non-proxy integration.
AWS API Gateway has a graphical interface that expresses this flow and allows you to configure it in 4 steps.
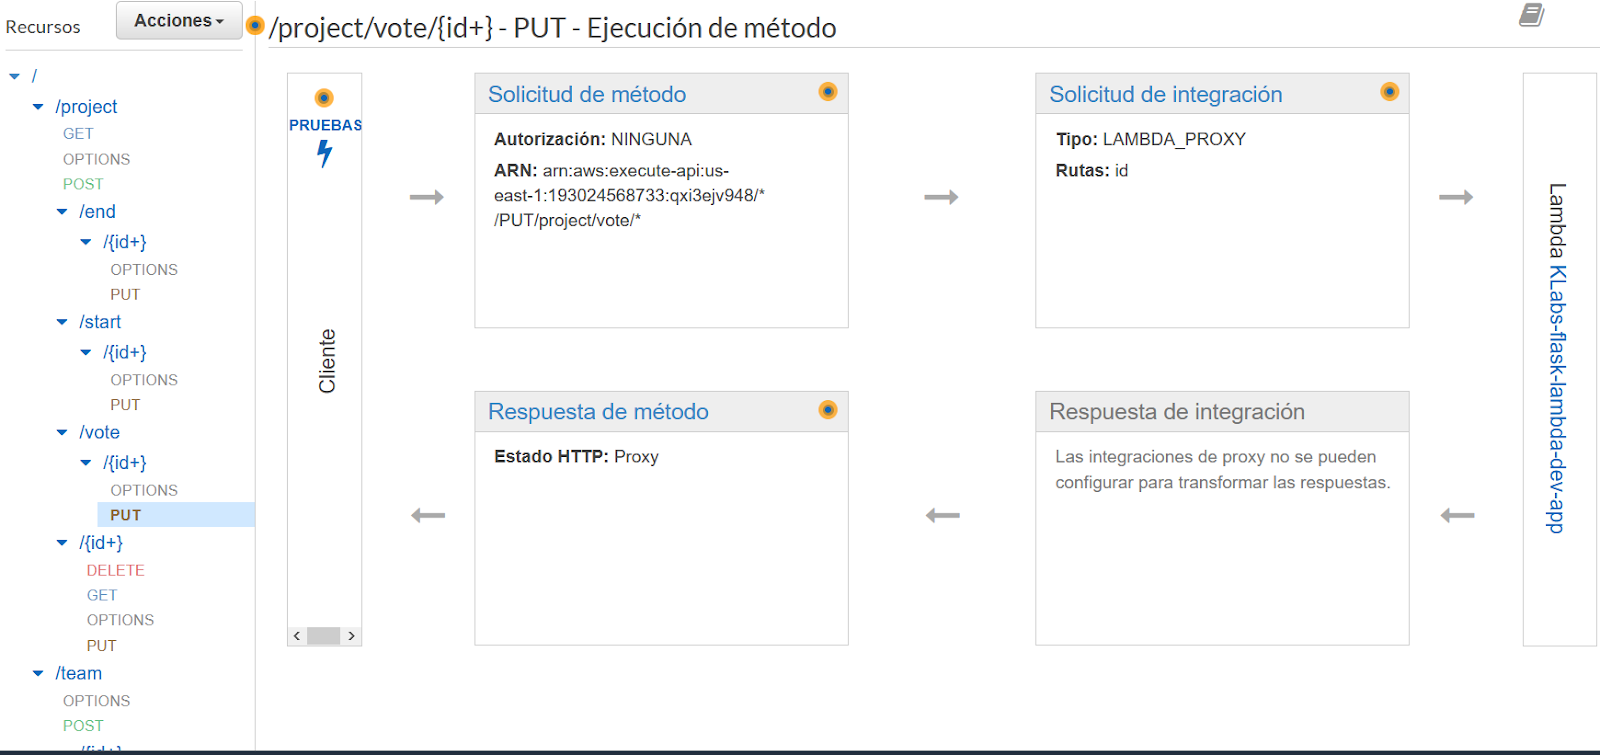
Request Method: configures request validation, authorization method, API Key usage and path or query parameter mapping.
Integration request: configure the type of integration, proxy or not and the service to send the request to. In the case of the image we communicate with a lambda function in a proxy way. An example of transformation code to map the path parameter in the payload that the backend receives:
Integration response: it receives the response from the server and can transform it. This example looks for the word error in the server response, when it finds it then transforms the response code to "400".
Method response: provides information about the response types
The possibility of making a mock integration and treating it as a non proxy helps to decouple the development of the application.
Security
API Gateway allows you to manage API security in several ways.
CORS
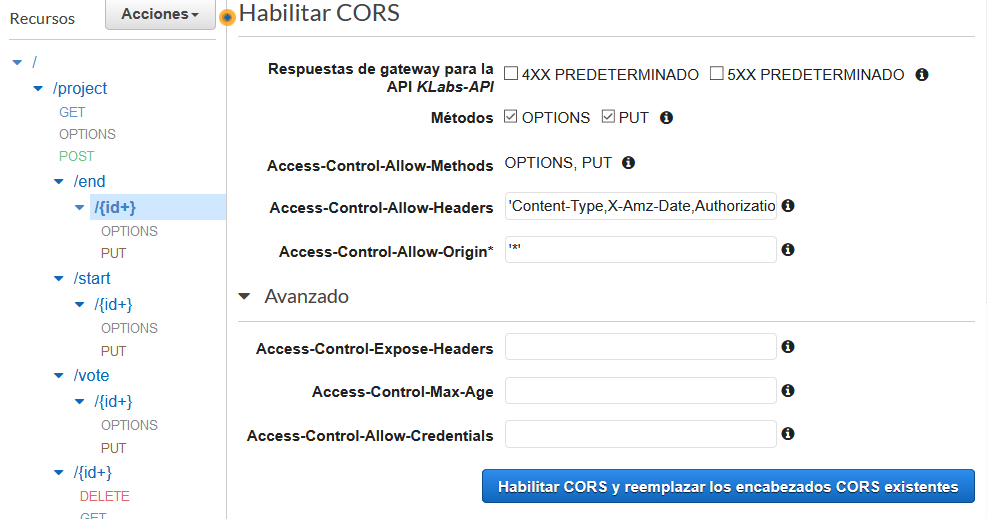
You can configure the headers to include CORS parameters that will help control the origin and allowed methods of API calls. This can be described in OAS3 or configured from the console in the Actions menu. It is important to remember that to enable CORS we need to have the OPTIONS method on the resource. The AWS console does this for you but you must do it for each resource in your API.
API Key
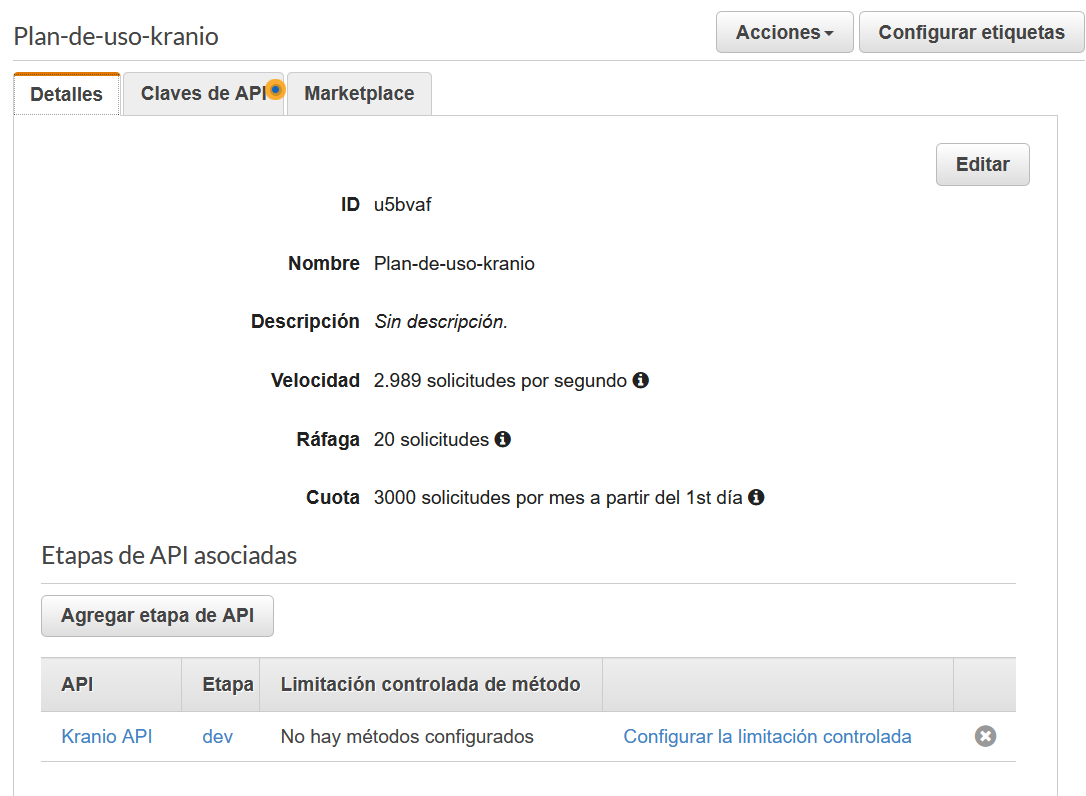
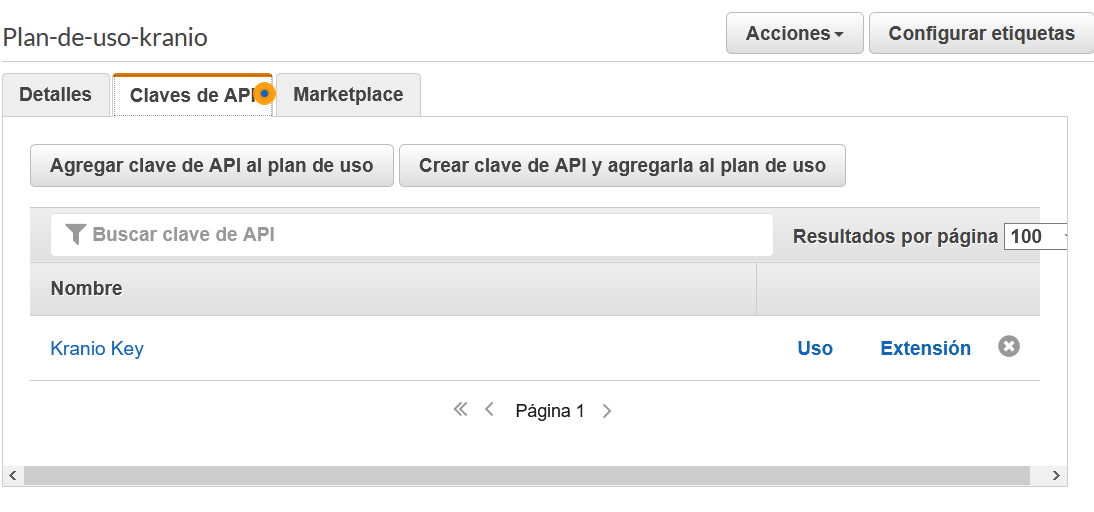
You can configure access to your API using API Key. With it you can identify who makes the call and restrict the use of the API through quota or throttling.
To enable an API Key you need to have a Usage Plan associated to a Stage of your API. To create it go to the Usage Plans menu, press the Create button and follow the instructions. When finished you will have an API Key associated to your API and it will be requested in the x-api-key header of the request.
Remember to enable the endpoint to require API Key in the Method Request.
AWS IAM
AWS has its own identification and permissions service called AWS IAM. It is governed by the principle of least privilege so it has a detailed way of giving permissions.
With IAM you identify yourself to the api with your user's programmatic keys. When you are identified, API Gateway calculates if your user has the necessary permissions to invoke the endpoint.
Authorizers
You can configure the authorizers in the "Authorizers" menu on the left side and they can be of two types:
Lambda Authorizer
It receives as input a header parameter, usually "Authorization". This value is redirected to a lambda function that discriminates whether it is valid or not and returns a temporary policy that allows invoking that endpoint. We can use this authorization with tokens like JWT or OAuth or SAML protocols.
AWS Cognito
Uses the AWS Cognito service to manage custom users, credentials, and permissions. Supports federated identity users such as Google, Facebook OpenID Connect and others.
Monitoring
You can monitor your API Gateway using AWS Cloudwatch. In order to enable monitoring, you must assign the corresponding role to the API Gateway in the Settings menu on the left-hand side. You also need to enable it in the Stages menu , Logs/Tracking tab. I recommend that you select the INFO log level to get a detailed log of the API Gateway flow.
AWS Cloudwatch displays log groups for you to debug. You can use API Gateway metrics or create custom metrics and make them visually available through dashboards. You can also set alarms to notify you if any metric exceeds a defined limit.
Additional Tools
Caché
In the Stages menu we can select if we want to enable API Gateway caching which will create a dedicated cache instance. By default and for security, only GET methods are cached.
SDK
When you have the api created, tested and implemented and you want to use it in some project you can generate an SDK available for Java, Android, iOS, JavaScript and Ruby languages. Use them to call your API from the client-side application.
Create it in the Stages menu, SDK Generation tab and choose the language of your choice. Click the Generate SDK button to download it ready to use.
Conclusion
Now that you know what an API is, how to create, implement and monitor it, I invite you to use the tools described in this post and think about how to take advantage of the benefits of an API to bring value to your business, application or development process.
If you need help to create or accelerate your project, Let's Talk


%2011.18.35%E2%80%AFa.%C2%A0m..png)

%201.17.38%E2%80%AFp.%C2%A0m..png)


.png)
.png)
